Choosing the right battery cable size is crucial for safety and optimal electrical system performance. A properly sized cable prevents voltage drops, overheating, and equipment damage.
This guide covers the importance of correct cable sizing, explains battery wire gauge measurement standards, highlights key selection factors provides a reference battery cable size chart, and includes practical sizing examples.
Battery Wire Gauge
Battery wire gauge refers to the thickness of the wire used to connect a battery to other electrical components and is commonly measured using the American Wire Gauge (AWG) system.
From the battery wire gauge chart below, it's clear that for standard numbered gauges, the larger the number, the thinner the wire.
There is also another type with “0” in its designation, called “aught”.
The "aught" (0) notation means the wire is thicker than standard numbered gauges. The more zeros there are, the thicker the wire.
Wire Gauge Sizes Chart

Note: The overall outside diameter with insulation varies based on insulation type and thickness; the provided values are approximate and assume standard insulation. For more details, refer to the American Wire Gauge page on Wikipedia.
Battery cable diameter is inversely proportional to resistance—thicker cables have lower resistance, allowing them to carry more current over the same length. But it doesn't mean thicker cables are always better. The right cable size balances cost, flexibility, and efficiency.
Thinner cables, on the other hand, have higher resistance, leading to greater voltage drop and potential overheating risks. This is why battery cable size charts provide amperage capacity ratings based on wire gauge and cable length.
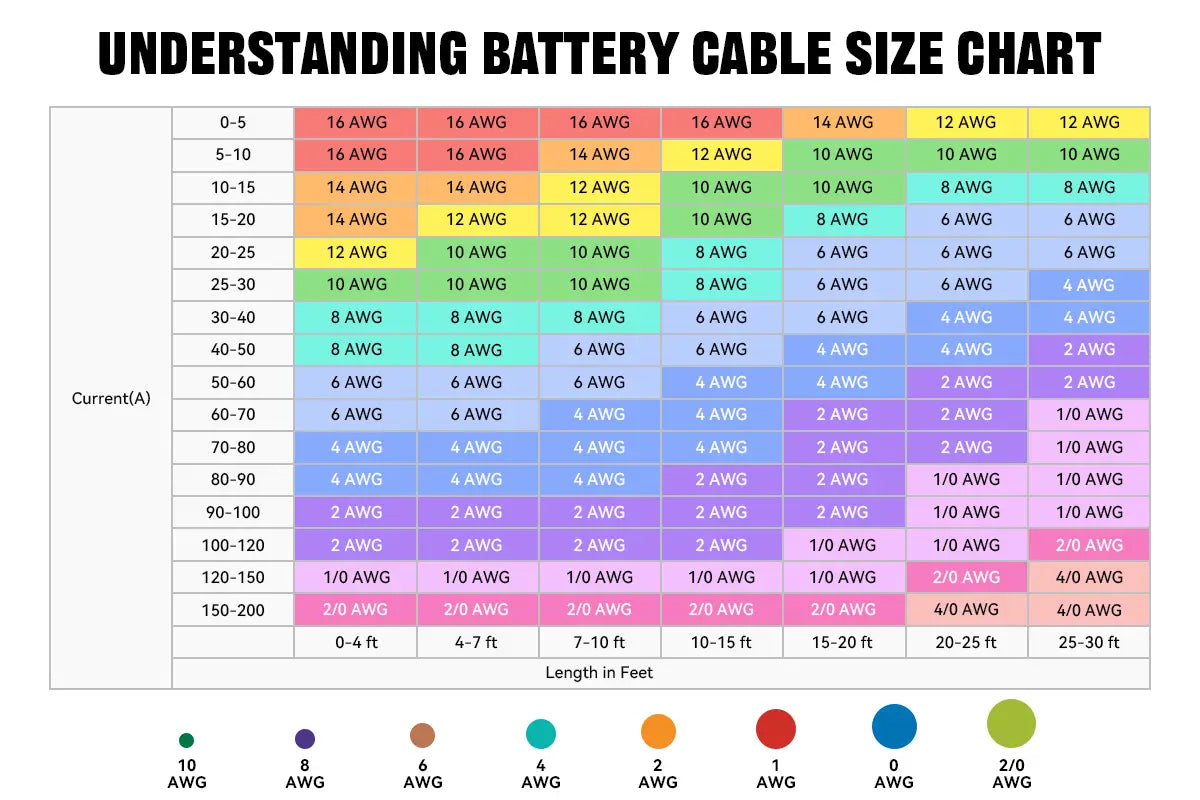
Battery Cable Size Chart
The Battery Cable Size Chart provides a clear and intuitive way to determine the right cable size for your power system. Below is a compiled battery cable size chart, along with a step-by-step guide to selecting the correct gauge based on amperage, voltage, and cable length.
-
Identify the required amperage
Locate the current (in amps) your system draws from the battery on the left side of the chart. -
Measure the total cable length
Carefully plan your battery layout based on series or parallel connections, then measure the total length of the cable needed, including connections between batteries and from the battery bank to the inverter. - Find the correct cable sizeMatch the measured cable length (bottom of the chart) with the corresponding amperage row to determine the required battery cable gauge at their intersection.

Next, we outline how to calculate the correct battery cable gauge size and use the battery cable size chart to determine what size battery cable you need.
How Do You Determing the Battery Cable Gauge Size
When setting up a battery system, choosing the right cable size is essential to ensure efficiency, safety, and optimal performance. Below, we outline the steps to calculate the correct battery cable gauge size using the battery cable size chart.
Note:
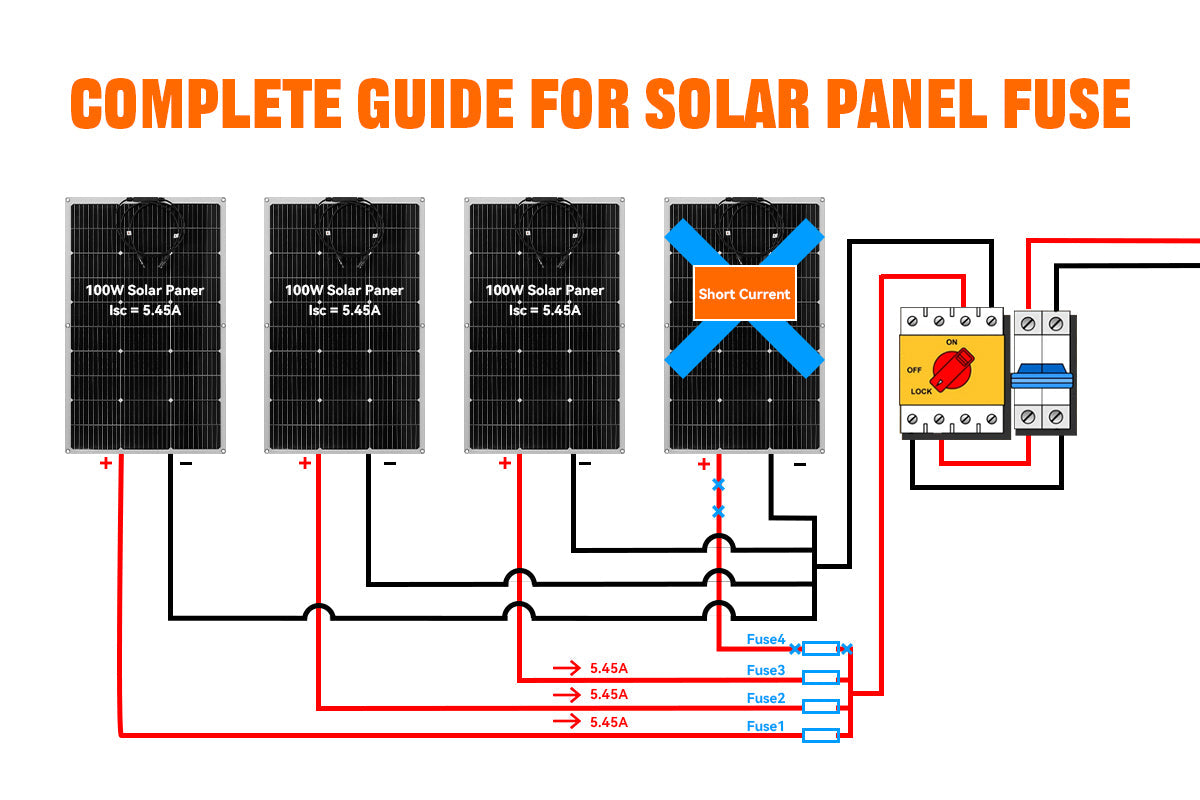
Don’t forget to add a fuse to protect the battery cable from overheating. To ensure it functions properly during a fault, the fuse’s rated current must be lower than the cable’s ampacity.
Step1. How Much Amp Do You Need to Carry?
The first step in selecting the appropriate battery cable gauge is identifying the current (amperage) your system will carry.
Since current varies across different parts of the circuit, each cable must be sized based on its specific role:
Battery to battery cable size
The cable connecting batteries in a bank must support the battery's maximum charge or discharge current, whichever the larger.
Cable Ampacity ≥ Battery’s Max Continuous Charge/Discharge Current
Charge controller to battery wire size
The charging current from the charge controller to the battery is generally predictable, staying within its max charging rate. To size the wire to handle this current, simply multiply at least 1.25 times the charge controller's rated amperage, in accordance with NEC guidelines.
Cable Ampacity ≥ Charge Controller Rated Amps × 1.25
Battery to inverter wire size
The current flowing between the battery and inverter depends on the inverter’s power demand, system voltage, and inverter efficiency. Unlike the charging current, this current can vary widely depending on the load connected to the inverter.
To size the cable size between the battery and inverter, divide the inverter’s continuous power by its efficiency and battery system voltage, then multiply by 1.25.
Cable Ampacity ≥ Inverter Power (W) ÷ Efficiency (%) ÷ Battery Voltage × 1.25
Step2. How Long Will the Battery Cable Run?
Cable length plays a crucial role in determining the right gauge. The longer the cable, the higher the resistance, which leads to voltage drop. To minimize power loss, you need a thicker cable for longer runs.
When measuring battery cable length, consider the full circuit length (positive and negative cable combined). Use a battery cable size chart to match your amperage needs with the correct gauge based on the total length of the cable run.
Step3. Find Out the Appropiate Battery Cable Size
Using the Battery Cable Size Chart above, find your current draw on the left and match it to your cable length to find the appropriate AWG size.
Note:
Always refer to the manufacturer’s manual for your battery, inverter, or charge controller. If specific wire or fuse sizes are provided, follow those first, as they reflect the exact needs of the device. The 1.25 safety factor is based on NEC and may vary by country or local code.
Example of determining wire size for batteries
Let’s walk through a practical example using a 12V 100Ah LiFePO₄ battery (100A max charge/discharge), a 30A solar charge controller, and an inverter at three system voltages: 12V, 24V, and 48V.
Wire Size for 100Amp
Since the battery’s maximum discharge current is 100A, you must select a wire gauge that can safely handle this current.
Below is a wire size reference for safely carrying 100A over various round-trip lengths:
| Cable Length (ft) | Minimum AWG Size |
|---|---|
| 5 ft | 2 AWG |
| 10 ft | 2 AWG |
| 15 ft | 1/0 AWG |
| 20 ft | 1/0 AWG |
For a 10-foot round-trip circuit connecting two 12V batteries with a maximum discharge current of 100 amps, 2 AWG copper wire is recommended.
Wire Size for 30Amp
When charging a 12V battery, the solar charge controller will maintain the current within its rated limit. If the cable run between the charge controller and the battery is short (e.g., 5 feet total round trip) and the charge controller is rated at 30 amps, you can use 8 AWG copper wire, which complies with the 1.25 safety factor.
Below is a wire sizing table for 30A at various cable lengths:
| Cable Length (ft) | Minimum AWG Size |
|---|---|
| 5 ft | 8 AWG |
| 10 ft | 6 AWG |
| 15 ft | 6 AWG |
| 20 ft | 4 AWG |
Wire Size for 12v/24v/48v Battery
The wire size between the battery and inverter depends on both the inverter’s power demand and the system’s operating voltage. Let’s see how each factor impacts the wire size.
12V battery cable size chart
For a 12V system powering a 1000W inverter with 94% efficiency, the battery current is calculated by dividing 1000 watts by 0.94 efficiency, then dividing by 12 volts. This results in approximately 88.7 amps. Applying the 1.25 safety factor, the cable must support about 111 amps. For a 5-foot round trip, 1 AWG copper wire is recommended to safely carry this current.
| Cable Length (ft) | Minimum AWG Size |
|---|---|
| 5 ft | 2 AWG |
| 10 ft | 2 AWG |
| 15 ft | 1/0 AWG |
| 20 ft | 1/0 AWG |
24V battery cable size chart
For a 24V system with a 2500W inverter at 80% efficiency, the current from the battery is approximately 130.2 amps before applying safety margin. After multiplying by 1.25, the cable must support about 163 amps. For a 5-foot round trip, 2/0 AWG copper wire is recommended to handle this safely.
| Cable Length (ft) | Minimum AWG Size |
|---|---|
| 5 ft | 2/0 AWG |
| 10 ft | 2/0 AWG |
| 15 ft | 2/0 AWG |
| 20 ft | 4/0 AWG |
48V battery cable size chart
In a 48V system powering a 5000W inverter at 95% efficiency, the battery current is roughly 110.5 amps after applying the 1.25 safety factor. For a short 5-foot cable run, 2 AWG copper wire is typically sufficient to carry this current safely.
| Cable Length (ft) | Recommended AWG Size |
|---|---|
| 5 ft | 2 AWG |
| 10 ft | 2 AWG |
| 15 ft | 1/0 AWG |
| 20 ft | 1/0 AWG |
Note:
Since all the energy is drawn from the battery, you need to ensure that the calculated amperage includes all connected loads. If your battery is supplying power to both a DC to AC inverter and direct DC loads, only calculating the inverter's power consumption could lead to undersized battery cables, causing overheating and inefficiency.
FAQs or Common Mistakes on Battery Cable Size
What happens if my battery cable is too small?
A cable that is too small causes voltage drop, overheating, and even wire melting. The increased resistance results in inefficient power transmission, leading to appliance failures and potential fire hazards.
What happens if my battery cable is too big?
Using a larger battery cable than necessary does not harm the system, but it increases cost, weight, and installation difficulty. Thicker cables are harder to bend and manage, especially in tight spaces like vehicles. Unless you are running a short cable, the extra cost may not be worth it.
Does needing more current mean a larger cable is required?
Yes, the higher/ the current, the thicker the battery cable must be to prevent voltage drop and overheating. However, when current demand is high, using a higher system voltage reduces the need for thick cables.
This is why inverters above 2000W typically use 24V or higher DC systems—higher power requires more current, leading to larger cables. Increasing voltage improves efficiency and minimizes cable size.
So, more current needs a larger cable, but a higher voltage system can reduce this requirement.