The solar panel wire size is an essential element in solar panel installation, directly impacting safety, efficiency, and long-term performance. Choosing the wrong wire gauge can lead to power loss, overheating, or even fire hazards.
In this guide, you'll learn exactly how to choose the correct wire size based on voltage, amperage, and distance.
Amps or Volts for determining solar panel wire size
When determining solar panel wire size, amperage is prioritized over voltage because current directly affects wire heating and safety. As current flows through a wire, it generates heat (I²R loss). The higher the current, the more heat is produced. If the wire is too thin for the current it carries, it can overheat, damage insulation, or even cause a fire. This makes current the most critical factor for safe wire sizing.
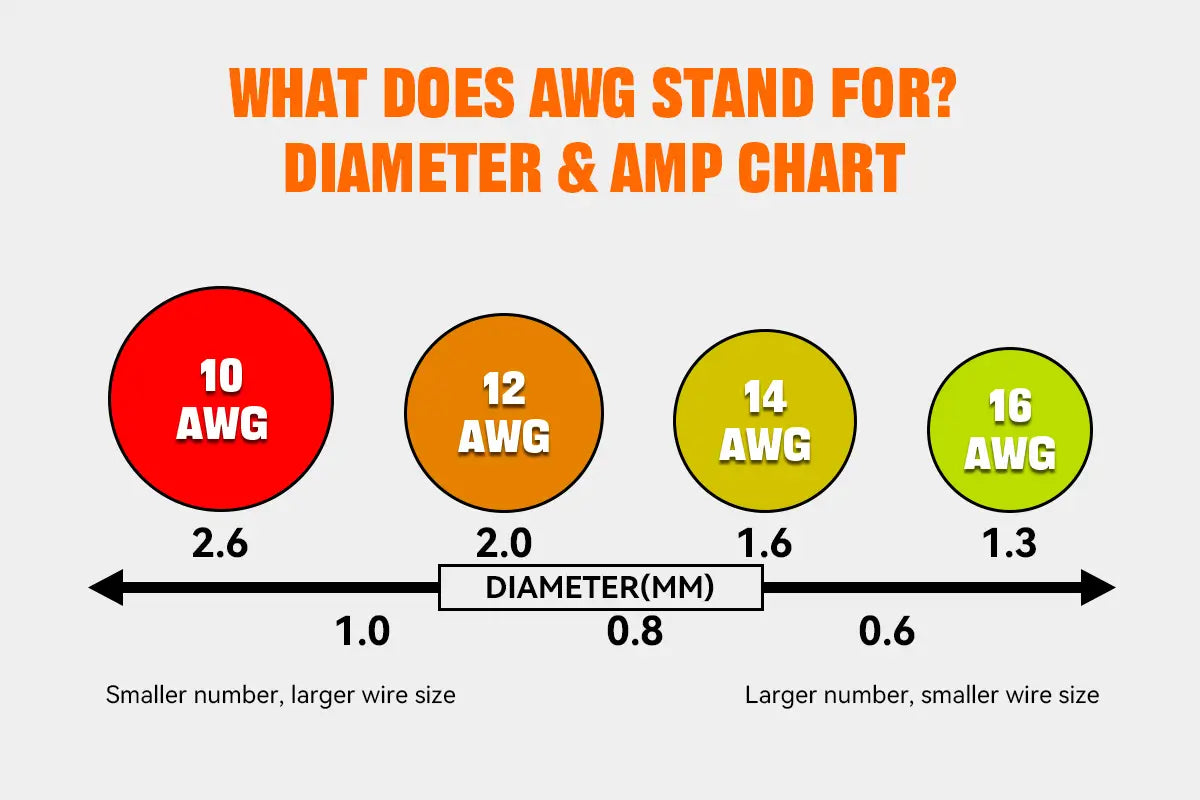
Wire gauge standards, such as those defined by the AWG system, are based on how much current a wire can safely carry without excessive heating. With this in mind, let’s explore the other major factors that influence wire size selection.
Factors that affect the needed solar panel wire size
Knowing that amps is the main factor in solar panel wire sizing, let’s explore how this applies in real-world installations and affects cable size selection.
1. Solar panels connection
The connection of solar panels, either in series or parallel, greatly impacts the current flowing through the wires and thus affects the wire size needed.
In a series connection, the voltages of each panel add up while the current remains the same as one panel’s output. This results in higher voltage but relatively low current, allowing for thinner wires.
However, in a parallel connection, special attention is needed because the current adds up with the number of panels connected. This means the current increases significantly, requiring thicker wires to safely handle the higher current load and prevent overheating or power loss.
2. Cable length
Wires are like water pipes: to carry the same amount of water (or current), the pipe’s cross-sectional area and length both matter. The longer the wire, the more resistance it has, which causes energy loss and voltage drop along the cable. To compensate for this, longer cables need to have a larger cross-sectional area (thicker wires) to carry the same current without losing too much voltage or generating excess heat.
In solar installations, to reduce costs, installers often try to keep cable lengths as short as possible. A shorter cable run means less resistance and allows for the use of thinner, more affordable wire without compromising safety or efficiency. Proper solar panels layout planning can help strike a balance between system performance and material cost.
How to calculate solar panel wire size
Now that we’ve covered key factors like current, voltage, cable length, and panel connections, let’s walk through the steps to calculate the correct solar panel wire size based on your system’s power and distance requirements.
Step1. Calculate the amp of the solar array
Start by determining the total wattage of your solar array, the specifications of the panels you're using, and how they are connected, whether in series, parallel, or a series-parallel combination. These configurations affect the total system voltage and current, which are essential for sizing the wire.
To find the current, start with the short-circuit current (Isc) rating of a single solar panel, usually found on the panel’s specification label. Depending on how your panels are connected, the total current varies as follows:
| Connection Type | How It Works | Total Current (Amps) |
|---|---|---|
| Series | Voltage adds up; current stays the same | Equal to the Isc of one panel |
| Parallel | Voltage stays the same; current adds up | Isc × number of panels |
| Series-Parallel | Panels are grouped in series strings, then connected in parallel | Isc × number of parallel strings |
Step2. Measure the length of the needed cable
Different connection types indirectly affect the complexity of cable routing and the actual wiring path, which in turn impacts the total cable length required. Specifically:
- In a simple series or parallel setup, the wiring is usually straightforward. Cable length mainly depends on the physical distance of between the panels and panels, between the panels and the DC circuit breaker. You measure the full round-trip distance along the actual cable path.
- For paralleling strings, two separate cable lengths need to be measured and wire sizes selected accordingly: one for the wiring from each solar panel string to the combiner box (where current is lower but cable runs may be longer), and another for the wiring from the combiner box to the DC circuit breaker (where current is higher but cable runs are usually shorter).
Step3. Determine the solar panel wire size
The final step is to determine the correct wire gauge. The wire size must be large enough to carry the calculated current in Step1 across the full cable length, while keeping the voltage drop within acceptable limits, typically under 3%.
First determine the current (amps) your system will carry, then measure the total round-trip cable length (from panel to controller and back). Locate the intersection of your current and distance in the table to find the recommended wire gauge.

For example, if you have a 200 watt solar panel with a rated current of about 9.35 amps and a round-trip cable length of 50 feet at 12 volts, applying a 1.56 safety factor brings the design current to approximately 14.6 amps. In this case, 8 AWG copper wire is recommended to keep voltage drop within acceptable limits and ensure safe operation.
If you connect two panels in parallel (totaling 400 watts), the adjusted current is around 29.2 amps, and 6 AWG is suitable.
For three panels (600 watts), the current reaches about 43.7 amps, requiring 4 AWG copper wire.