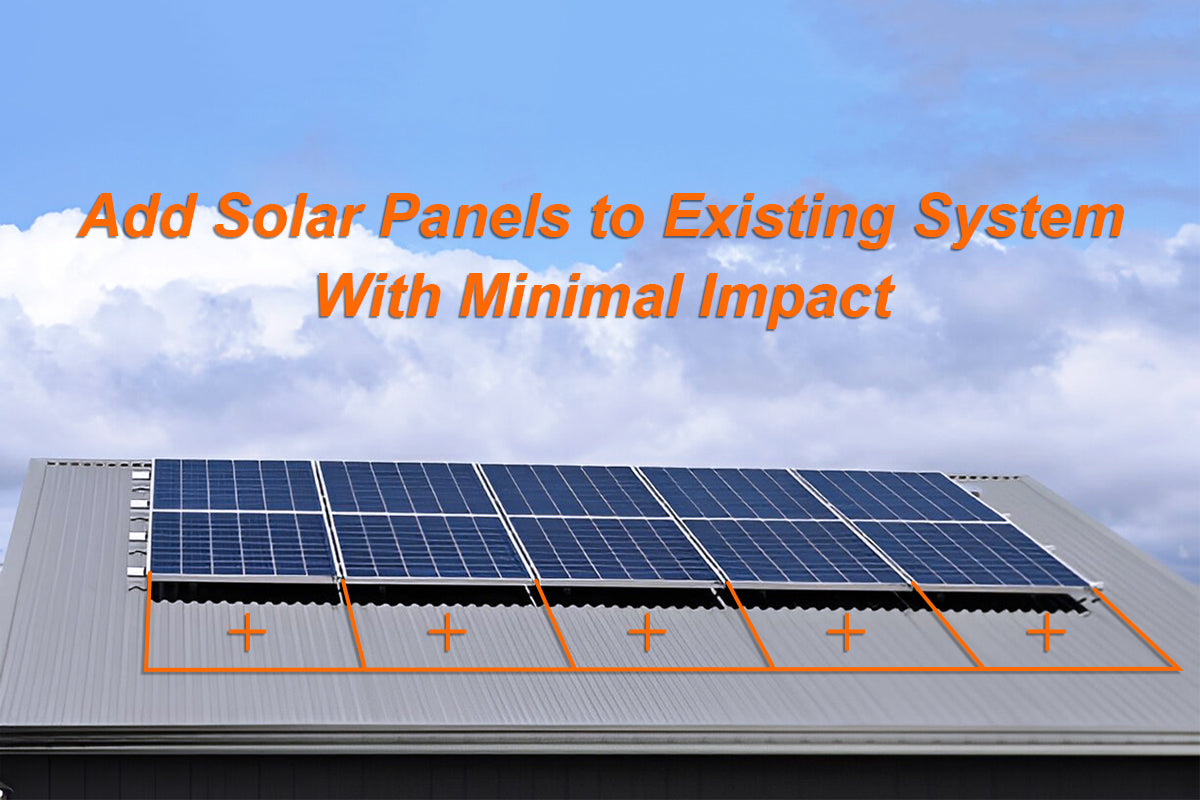
Various external factors, such as increased appliance usage and the integration of electric vehicles, may cause the solar energy production of many existing systems to lag behind the rising demand for electricity. Consequently, the expansion of solar systems is becoming increasingly prevalent.
Installing solar panels on an existing system requires careful planning and execution. To give you more ideas, this article explores key considerations and common methods for expanding a solar panel system, whether at home or on the road. However, if you lack professional experience, it's advisable to consult your original installer or find a professional to ensure safety.
Can I add solar panels to my existing system?
Yes, it's possible to install additional solar panels yourself if you have an off-grid system. However, for the electrically un-attuned, it's recommended to hire a professional, especially when it involves extending grid-tie systems.
Considerations before adding solar panels to existing system
Age of the existing solar panels system
The age of your current system can significantly affect the feasibility and efficiency of adding new panels. Older systems may feature outdated technology incompatible with newer panels.
Connecting old and new panels, especially when the older have lower voltage and current output, can lead to energy loss and reduced efficiency, as the entire solar panel system tends to operate at the level of the lowest voltage or amperage.
Avilable roof space
The first consideration is whether you have sufficient roof space to accommodate additional panels. It's essential to evaluate the available area to ensure that the new panels can be installed without compromising the efficiency of the existing system. Factors such as shading, orientation, and roof angle also play critical roles in determining the suitability of your roof for more panels.
The prime location for rooftop solar is in unobstructed southern areas. However, it's likely that the original solar system installation has already utilized these areas, so you may need to find a diverse PV orientation solution by installing solar panels in open spaces in western or eastern areas.
Some other alternatives include:
-
Replace old solar panels
Replacing old solar panels with new ones. Today's solar panels generate more electricity from the same roof space as equipment, and even more compared to decade-old panels. Sometimes, replacing old equipment can yield the biggest payoffs. -
Install in other locations
To ensure both the new and old solar panel systems operate at maximum efficiency, mount the new system in an orientation independent of the original, possibly facing west or east.
Alternatively, mount them on ground carports, pergolas, or other freestanding structures. If the new solar panels do not need to connect to a battery, a balcony solar system with a micro inverter is easier to install and allows for optimal direction and angle.
Related Article:
At this point, you might think that the cost of replacing old solar panels is too high, and expanding the system by establishing a new, independent solar power system with new battery system seems like a preferred choice, if you need to store excess power, leading to high costs and more complex management and monitoring of two battery systems.
However, don't jump to conclusions too quickly. There is also the solution of merging the old and new solar panel systems. Below, we will introduce how to add solar panels to existing solar systems for both houses and RVs.
How to add solar panels to existing home system
With panel technology evolving rapidly, finding matching panels for your existing array may become challenging. Some solar inverter manufacturers address this by offering support for multiple independent PV inputs or parallel-operated inverters, facilitating system expansion.
This type of inverter with built-in MPPT solar charge controllers individually tracks the maximum power point of different solar panel systems. Finally, they communicate and share data with each other and adjust the DC current to charge the same group of batteries.
Related Article:
Using Parallel Inverters to Create Expandable Solar System
Multi MPPT Hybrid Inverter - Diverse PV Orientations Solution
Confirm whether the current inverter has two or more photovoltaic input ports or supports parallel connection. If so, simply follow the relevant instructions in the manual to connect the new solar panels. Otherwise, we recommend replacing the original inverter so that you can install new panels without affecting the old array.
Here is the preparation and the steps for adding solar panels to your home's existing solar system:
Step1: Assessment and planning
Start with a comprehensive assessment of your current system and roof space. Determine where you will install the new solar panels, then calculate how many solar panels you need.
Step2: Select compatible solar inverter
Choose an inverter that is compatible with both your new and existing solar panel system. This includes matching the electrical parameters, such as max PV input power, MPPT operation voltage range, charging current, and other features. For guidance, read How to Choose an Inverter for a Solar System.
Additionally, choosing a multiple MPPT inverter or multiple inverters for parallel connection depends on your specific needs and life style:
- If you have higher load requirements than before, a parallel inverter is preferred. It can add solar panels to the existing system, manage different PV arrays independently, and increase the entire PV system's AC output power.
- If you've added batteries to your existing system and want to enhance the speed of battery charging, parallel connection of inverters would be more suitable.
- If your load requirements haven't changed and you just want to increase solar power generation to feed into the grid, a dual MPPT hybrid inverter with slightly higher rated power than the original inverter is a viable option. This provides headroom in case more power is ever needed.
We recommend the POW-Sunsmart LV12K, a 10kW hybrid inverter, because it is highly suitable for all of the aforementioned situations.

This model supports dual PV inputs on a single unit, allows for up to 6 units to be paralleled, and supports BMS communication. It is certified with UL1741, IEEE1547, and FCC, making it capable of both grid-tied and off-grid operation. Additionally, users can set maximum grid power feed-in via software and perform remote monitoring and control at any time.
If you’re a European user, opt for the SOLXPOW Series Three Phase Inverter.

POW-SunSmart LV12K inverter introdution & parallel configuration guide
Step3: Install additional panels
After completing the planning, component selection, and inverter installation, proceed with installing the new panels. Once the panels are mounted, connect the solar panel arrays to separate parallel inverters or different PV input ports of the inverter. This ensures that both the new and old solar panel systems maintain maximum efficiency while charging the same battery system.
Note:
If it's a grid-tied system, you'll require professional assistance for installing the smart meter. Please ensure compliance with local regulations.
Post-installation, continuously monitor the system's performance to ensure optimal energy production. Make adjustments as necessary and perform regular maintenance to keep the system running smoothly.
How to Add Solar Panels to Existing RV System
As for adding solar panels to an existing system of your RV, to ensure all the solar panels reach their highest efficiency, the consideration factors and installation steps are the same as adding solar panels to a residential solar system.
The only difference is that when adding solar panels to your RV's existing system, you can only charge the battery pack using a parallel controller. If the old controller doesn't support parallel connection, you'll need to purchase one that does.
Step1: Assessment and planning
Due to stricter space constraints in RVs, installing solar panels to the current system may necessitate a more precise calculation of panel quantity, as well as strategic planning for connecting and positioning various solar panel systems. We recommend referring to the following resources for guidance:
Step2: Choose a solar charge controller for parallel connection
The next step is to refer to our complete solar charge controller choosing guide to select the appropriate controller for the size and specifications of the designed solar panel systems.
And the following are additional points to note when adding extra solar panels to the existing RV system:
- If you only increase the battery system capacity to extend off-grid living backup time(capacity of the battery system) without changing the load power, you just need to purchase a controller that supports parallel operation.
- If you increase the number of electrical appliances you use, you will not only need to purchase a parallel controller but also a inverter with higher rated power to handle the increased AC power output.
PowMr offer three charge controllers for parallel connection: 60amp, 80amp and 100amp mppt solar charge controllers. All of them can auto detect 12v/24v/36v/48v battery system, and are compatible with battery of most types of chemistry.
It is worth mentioning that the 80A charge controller (POW-M100-PRO) and the 100A charge controller (POW-M100-PRO) can be connected in parallel with each other. This allows for flexible use of different models of controllers for various solar panel systems with different max input power.

Step3: Connect the solar charge controllers in parallel
Before connecting each array of solar panels to the controllers, complete the process of wiring the solar charge controllers in parallel. Follow this sequence for wiring: Battery > PV Input > Load. Ensure that all circuit breakers are in the off position before completing any wiring.
Step4: Install the solar panels and connect them to solar charge controllers
Mount the solar panels on your RV roof or other suitable location, ensuring optimal tilt and orientation for maximum sunlight exposure. Connect the solar panels to the solar charge controllers using appropriate cables and connectors. Double-check all connections and ensure proper grounding before switching on the circuit breakers.
Note:
Remember to configure the charging current for each controller and ensure that the total charging current from all controllers does not exceed the battery's maximum allowable charging current.